Creating a Stunning Los Angeles Sunset 3D Shadow Box: A Guide to Perfect Results
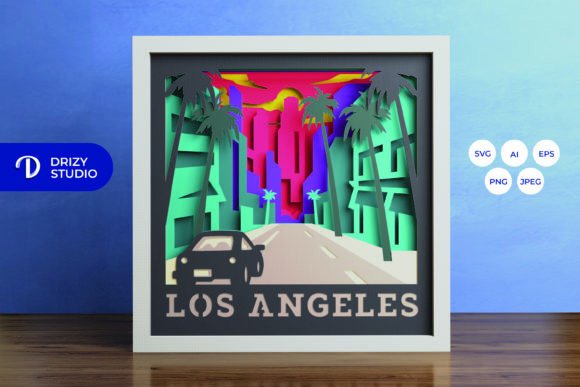
There is something uniquely captivating about capturing the golden hour glow of California in a physical format. The Los Angeles Sunset 3D Shadow Box offers a way to bring that iconic skyline and warm atmosphere into your home or studio through the art of layered paper cutting. Whether you are a seasoned crafter looking for your next project or a small business owner seeking unique wall decor ideas, this template provides a fantastic foundation. However, diving into 3D papercraft without understanding the nuances of layering, materials, and assembly can lead to frustrating results. By approaching this project with a clear plan and an eye for detail, you can avoid common pitfalls and create a piece that truly shines.
Understanding the Template and Its Potential
At its core, the Los Angeles 3D Paper Cut design is a sophisticated arrangement of ten distinct layers. Each layer contributes to the depth and realism of the final image, mimicking the rolling hills, urban structures, and atmospheric haze of a sunset over the city. When you acquire this template, you are receiving a versatile digital package available in AI, EPS, PNG, SVG, and JPEG formats. The inclusion of an SVG file is particularly valuable, as it allows for seamless integration with cutting machines like Silhouette and Cricut, ensuring precision that is difficult to achieve by hand alone.
The standard size for this design is 20.32×20.32 cm (approximately 8x8 inches), which fits perfectly into standard square frames. However, one of the most frequent misunderstandings beginners face involves resizing. While SVG files are vector-based and can be scaled up or down, it is crucial to maintain the aspect ratio. Stretching the design to fit a non-square frame will distort the buildings and natural elements, ruining the perspective that makes the 3D effect work. If you need a different size, scale the entire group proportionally and ensure your frame matches the new dimensions.
Common Mistakes in Material Selection and Assembly
The difference between a flat-looking craft and a stunning piece of art often comes down to material choice. A significant error many makers make is using paper that is too thick or too thin. If the cardstock is too heavy, the layers will not sit flush against each other, creating unwanted gaps that break the illusion of depth. Conversely, paper that is too flimsy may warp when glue is applied or fail to hold its shape within the frame. For the Los Angeles Sunset 3D Shadow Box, aim for high-quality cardstock between 65lb and 80lb cover weight. This provides enough rigidity to stand apart while remaining easy to cut and adhere.
Another area where projects often go wrong is the adhesive method. Using liquid glue can be messy and may cause the paper to buckle or stain, especially on lighter colors meant to represent the sky. Instead, opt for double-sided tape or foam adhesive squares. Foam tape is particularly effective for shadow boxes because it creates consistent spacing between the ten layers, enhancing the 3D effect without requiring you to manually measure spacers. Apply small dots of adhesive near the edges and structural points of each layer to keep them secure without visible residue.
Lighting and Presentation Errors
One of the most exciting features of this template is its potential as a lightbox. Many creators overlook the opportunity to add LED strips between the layers, which can transform the sunset hues into a glowing centerpiece. A common mistake here is placing the lights incorrectly. If LEDs are positioned behind the frontmost layer only, you lose the dimensional lighting effect. The best approach is to weave thin LED strips along the sides of the frame or attach them to the backboard, allowing the light to filter through the cutouts of each successive layer. This highlights the intricate details of the palm trees and skyscrapers, making the sunset appear to radiate from within.
Furthermore, consider the color of the paper itself. The preview images provided with the template are for reference only; the final look depends heavily on your paper choice. Using pure white paper for all layers can sometimes result in a sterile look that lacks the warmth of a real sunset. To correct this, consider using gradient papers or lightly tinting specific layers with soft oranges, pinks, and purples before assembly. This adds a level of sophistication and mimics the natural color shift of the sky during golden hour.
Optimizing Your Workflow for Quality and Efficiency
For those using cutting machines, file preparation is key. Although the provided AI and EPS files are ready to use, always check your cut settings on a scrap piece of paper first. Different brands of cardstock react differently to blade pressure and speed. Rushing this step can lead to torn edges or incomplete cuts, forcing you to restart the entire layer. Take the time to calibrate your machine; it saves time and materials in the long run.
If you are cutting by hand with an art knife and scissors, patience is your most important tool. Do not try to cut complex inner details in one pass. Instead, make several light passes to gradually deepen the cut. This prevents the blade from slipping and ensures clean lines, which are essential for the professional finish of a Los Angeles 3D Paper Cut project. Keep your blades sharp; a dull blade crushes the paper fibers rather than slicing them, leading to frayed edges that detract from the overall quality.
Making the Right Decision for Your Project
Before downloading or purchasing the Los Angeles Sunset 3D Shadow Box template, evaluate your intended use. Are you creating a one-off gift for a friend, or do you plan to sell these as part of a small business inventory? If you are a freelancer or entrepreneur, ensure you understand the licensing terms regarding commercial use. Additionally, consider the framing early in the process. A deep-box frame is necessary to accommodate the ten layers plus any lighting elements. Standard photo frames will likely be too shallow, compressing the layers and flattening the 3D effect.
Ultimately, this project is about blending technical precision with artistic expression. By paying attention to paper weight, adhesive choices, lighting placement, and proper scaling, you can avoid the frustration of a subpar result. Whether displayed on a mantle, hung in an office, or gifted to a loved one who misses the California sun, a well-executed shadow box serves as a beautiful tribute to the city's iconic landscape. Take your time, respect the layers, and let the design do the work.