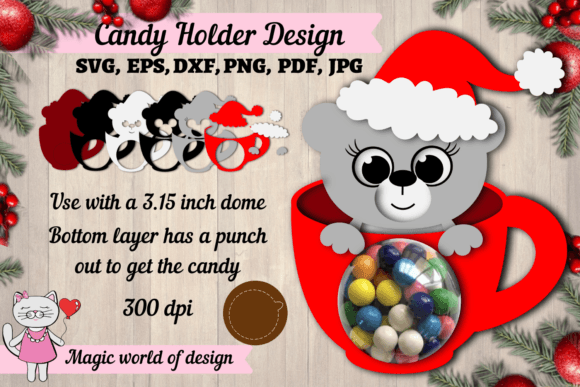
Crafting a 3D Christmas Candy Dome Bear: A Guide to Digital Design and Assembly
The intersection of traditional crafting and modern digital technology has revolutionized how we approach holiday gift-giving. Among the most charming innovations in this space is the 3d Christmas Candy Dome Bear, a project that combines the nostalgia of handmade paper crafts with the precision of computer-aided design. This unique creation serves not only as a decorative centerpiece but also as a functional vessel for sweets, making it an ideal choice for educators teaching geometry, hobbyists exploring papercraft, and business owners looking for distinctive seasonal products. By utilizing pre-sized SVG cutting files, creators can bypass the tedious process of manual drafting and focus on the tactile joy of assembly and customization.
The Evolution of Papercraft Through Digital Files
Papercraft has existed for centuries, evolving from simple origami to complex architectural models. However, the barrier to entry was often high, requiring advanced spatial reasoning and precise measuring tools. The advent of digital cutting files has democratized this art form. When you access a digital download containing formats like SVG, PNG, EPS, DXF, PDF, and JPEG, you are accessing a blueprint that has been mathematically optimized for structural integrity.
These files are typically delivered in a compressed zip file, ensuring that all necessary components are organized and ready for immediate use. The inclusion of multiple file formats ensures compatibility across a vast spectrum of hardware and software. For instance, users with Cricut or Silhouette machines rely heavily on SVG and DXF files for vector-based cutting, while those using standard home printers may prefer the high-resolution PDF or JPEG options. The fact that these files are rendered at 300 dpi guarantees that any printed element, such as textural details on the bear's fur or facial features, remains crisp and professional, regardless of the scaling applied by the user.
Understanding File Formats and Compatibility
Before beginning the physical creation of a 3d Christmas Candy Dome Bear, it is crucial to understand the tools required to process the digital assets. The listing for such a project specifies that it is a digital download with no physical product shipped. This distinction is vital for consumers who must prepare their own materials. Once the zip file is downloaded and extracted, the creator must verify their software compatibility.
- SVG (Scalable Vector Graphics): Ideal for cutting machines, allowing for infinite scaling without loss of quality.
- DXF (Drawing Exchange Format): Often used in CAD software and compatible with older cutting machine models.
- EPS (Encapsulated PostScript): Preferred by professional graphic designers using Adobe Illustrator for further customization.
- PNG and JPEG: Raster images useful for previewing the design or printing static elements if vector cutting is not available.
- PDF: A universal format that preserves layout and is excellent for printing templates directly onto cardstock.
Professionals in the design industry appreciate this versatility because it allows the same core design to be adapted for mass production via industrial die-cutters or for small-batch creation in a home classroom. Researchers studying the impact of digital fabrication on craft industries often cite this multi-format approach as a key factor in the widespread adoption of DIY projects.
Material Selection and Structural Considerations
The success of any 3D paper model relies heavily on the choice of material. For a 3d Christmas Candy Dome Bear, the instructions explicitly recommend using cardstock. This is not merely a suggestion but a structural necessity. Standard printer paper lacks the rigidity required to hold the shape of a dome, especially when filled with the weight of candy. Cardstock, typically ranging from 65lb to 110lb cover weight, provides the perfect balance between flexibility for folding and stiffness for support.
When selecting cardstock, creators should consider the finish. A matte finish often adheres better with standard white glue and reduces glare, enhancing the visual appeal of the bear. Conversely, a glossy finish might offer water resistance if the treat inside is prone to melting, though it can make gluing more challenging. The "pre-sized" nature of the SVG files means the designer has already calculated the tab sizes and fold lines based on standard cardstock thickness. Deviating significantly from this recommended material could result in gaps in the assembly or a dome that collapses under pressure.
The Mechanics of the Dome Structure
The geometric engineering behind the candy dome is fascinating. It typically utilizes a series of concentric rings or layered segments that taper toward the top. This layering technique distributes weight evenly and creates a smooth, rounded surface that mimics a glass cloche. In the context of the bear design, these layers often double as decorative elements, perhaps representing the bear's body or a festive sweater pattern.
Constructing this requires a methodical approach. The directions usually advise working from the bottom up. This gravity-assisted assembly ensures that each layer has a solid foundation before the next is added. If one were to attempt to build from the top down, maintaining alignment would be nearly impossible without specialized jigs. The interlocking nature of the cut pieces, defined by the vector paths in the SVG file, creates a self-supporting lattice that becomes increasingly rigid as the structure nears completion.
Step-by-Step Assembly Workflow
Transforming digital vectors into a tangible 3d Christmas Candy Dome Bear is a rewarding process that blends precision with creativity. The workflow generally follows a logical progression designed to minimize errors and maximize structural stability.
- Preparation and Cutting: Begin by loading your chosen cardstock into your cutting machine or printer. Ensure the settings are calibrated for the specific weight of the paper. If using a blade cutter, perform a test cut on a scrap piece to determine the optimal pressure and depth. Cut each piece out of the cardstock carefully, paying attention to intricate details like the bear's ears or paws.
- Base Construction: Identify the bottom layer of the design. Apply a thin, even layer of adhesive to the designated tabs. Precision here is key; too much glue can warp the paper, while too little will fail to hold the weight. Attach this layer to a flat surface or a sturdy base plate if provided in the design.
- Filling the Vessel: Before closing the dome, this is the critical moment to introduce the "gift" aspect. Fill the dome with candy. Hard candies, chocolates, or small wrapped treats work best. Avoid overly heavy items that might distort the paper walls. The volume of candy should be sufficient to support the inner walls but not so packed that it forces the layers apart.
- Layered Assembly: Work your way up, gluing the cardstock onto the previously glued layer. Align the registration marks or notches precisely. Hold each section in place for a few seconds to allow the adhesive to set. This repetitive motion builds the curvature of the dome. Patience is essential here; rushing can lead to misalignment that compounds as the structure grows taller.
- Final Touches: Once the final layer is secured and the dome is complete, inspect the seams. Any minor gaps can be touched up with a small amount of glue or concealed with decorative ribbon. The bear features, often separate cutouts, are then attached to the exterior, bringing the character to life.
Educational and Commercial Applications
Beyond the immediate satisfaction of completing a craft project, the 3d Christmas Candy Dome Bear holds significant value in educational and commercial settings. For educators, particularly those teaching STEM (Science, Technology, Engineering, and Mathematics), this project offers a practical lesson in geometry. Students can explore concepts such as circumference, radius, and structural load-bearing by analyzing how flat 2D shapes transform into a 3D sphere. The process of following the digital instructions also enhances fine motor skills and the ability to interpret technical diagrams.
For small business owners and entrepreneurs, these digital designs represent a low-overhead opportunity for product creation. Since the listing is for a digital download, the initial investment is minimal. Business owners can purchase the license, source bulk cardstock and candy, and assemble these bears as premium holiday gifts or corporate favors. The high-resolution nature of the files allows for branding opportunities; a company logo could potentially be incorporated into the design file before cutting, turning a cute bear into a branded marketing tool.
Sustainability and Reusability
In an era where sustainability is a primary concern for consumers, paper crafts offer an eco-friendly alternative to plastic packaging. The 3d Christmas Candy Dome Bear is made entirely from biodegradable cardstock. Unlike plastic containers that may linger in landfills for centuries, this packaging can be recycled or composted after the contents are consumed. Furthermore, the durability of the construction means the dome can potentially be reused year after year as a decorative ornament, extending its lifecycle and reducing waste.
The digital nature of the product also reduces the carbon footprint associated with shipping. Since no physical product is shipped, there are no emissions from transportation logistics. The consumer downloads the file instantly, eliminating the need for packaging materials, fuel, and warehousing associated with physical goods. This model aligns perfectly with the growing demand for sustainable consumption practices among both individual hobbyists and corporate buyers.
Troubleshooting and Best Practices
Even with precise digital files, challenges can arise during the physical creation process. One common issue is warping, which occurs when moisture from the glue saturates the cardstock. To mitigate this, experts recommend using a glue stick or a fine-tip applicator bottle for liquid glue, applying it sparingly. Another potential hurdle is the compatibility of the files with specific software versions. Users are advised to check their software updates regularly. If an SVG file fails to load, converting it to a DXF or PDF within a vector editing program can often resolve the issue.
Additionally, the choice of candy matters. Chocolates can melt if the room temperature is high, potentially damaging the interior of the paper dome. Hard candies or individually wrapped items are safer bets. If chocolate is a must, consider lining the interior of the dome with a small cupcake liner or wax paper before filling, creating a barrier between the treat and the cardstock.
The versatility of the 3d Christmas Candy Dome Bear lies in its adaptability. Whether used as a classroom project to teach spatial awareness, a heartfelt homemade gift for a loved one, or a unique product for a holiday market stall, the underlying principles remain the same. The convergence of high-quality digital design and traditional crafting techniques empowers users to create something truly special. By leveraging pre-sized SVG cutting files and adhering to proper assembly techniques, anyone can master the art of constructing these delightful edible domes, proving that technology and tradition can indeed work hand in hand to create magic during the holiday season.